Showing posts with label relief sculpture. Show all posts

Monday, March 2, 2015

Paper Mache Gothic-Inspired Cathedrals

Over the last couple of weeks we have been working on architecture design- drawing, printing and now over-sized paper mache relief sculptures. This was a feat for us since we only created 7 works, one on each table in the classroom (more about that later).

To begin we watched an amazing NOVA-produced video called the Building the Great Cathedrals. It was a perfect introduction to these engineering marvels. Students were then asked to draw a Gothic style cathedral using a shape tracing method shown in Deep Space Sparkle's Architecture Made Easy PDF. These drawings became our blueprints for how were were going to construct the cardboard and paper mache sculptures.

The plan was to have each table create a cathedral. That's right- one project per table...all day long. As each class came in for the day, whomever sits at that table would continue to add to that work. This was a challenge in itself; we worked the best we could with what was left after each block. However, this turned out to be a very successful large scale project challenge. Not only was it engaging but the transfer of skills from collaboration, to communication to just plain ol' perseverance was hard to ignore. Nice job 7th graders!




Friday, October 24, 2014

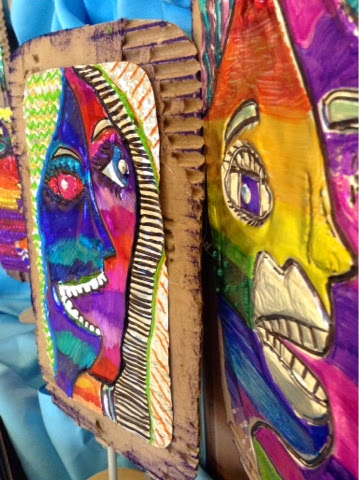
Picasso Portraits (tooling foil edition)

Picasso Portraits are an 8th grade lesson we've done a number of times here at BMS. We start with practicing realistic portraits by looking at facial proportions and do a couple of "draw together" activities. Typically, I will draw and project on my Ladibug doc cam and students will follow along with me.  I also show a number of YouTube demo videos on specific parts like eyes and noses. One of my favorites for a realistic eye=>>>>  https://www.youtube.com/watch?v=LZ9Hpp8JygIc

After we feel comfortable with drawing a realistic face,  we move on to creating a portrait done in the Cubist style. I spend lots of time emphasizing the fact that a Cubist work shows multiple views in one artwork.  Again, we practice together before we start the final work.

This quarter, the project was created on metal tooling foil. We drew a final copy and then that image was embossed on the foil using a ball-point pen. Color Sharpies were used to show emphasis, pattern, gradation of color as well as texture though the embossing of the metal.

Students were also asked to mount the foil on a piece of distressed cardboard for display. We made small wooden stands from scraps from the tech department.

A twist on an old favorite!