Showing posts with label Collage. Show all posts

Friday, January 30, 2015

Graffiti Mola Names


7th graders started their quarter off with a project inspired by this Blick lesson as well as the work of Andrew McCormick's students. To introduce the idea of graffiti, we talked about street art (the ethics behind illegal and legal street art) as well as the idea of reverse graffiti and it's implications.

We also used many resources from http://graffitidiplomacy.com/ to help up along in our name designs. Value shading with colored pencil  and pattern design (with the metallic sticky paper in background) was a big focus of our work and reflected on our rubric.


These were a great first project to begin with since students names were so obviously drawn into the work. Hopefully they help me learn names faster this quarter! 

Check out this graffiti generator for ideas on how to get started drawing names in graffiti styles. 
Very cool!


Check out some of our finished work below...


Monday, January 26, 2015

Watercolor Landscape Collages

Watercolor paint is one of our favorite mediums at BMS. No matter how often we use it in class, students are intrigued by the endless possibilities.


I usually start of our watercolor introduction with a series of stations so students can explore the options. Wet-in-wet, wash, dry brush, rubbing alcohol, salt, scraping and blotting are some of the old standbys that I teach often. This quarter we looked at some other ideas like plastic wrap, crystallizing (using Epsom salts) and rice absorbing. The results were fabulous!


Plastic wrap technique...


Dry brush and plastic wrap techniques...


Wet-in-wet and rubbing alcohol techniques...


Oil technique...

***Be watching for a handout on all of these techniques in the next month on theartofed.com

Once we had a good understanding of all the possibilities that watercolor can create, we started to paint strips of paper to represent textured parts of a landscape (the strips were torn before we started).  Most students painted between 7-8 strips of paper to use within their landscape and combined it with colored construction paper to complete the finished work. 


Tuesday, January 6, 2015

Surrealist Collage Pattern Portraits


For our final work in our portrait unit, we completed a Surrealist-style collage drawing. We had previously spent a lot of time drawing realistic portraits and features so this time around we completely "cheated" with the face part of the work by starting with a magazine portrait (human or animal).

This artwork was of great inspiration for us as well as the Surrealist work of Dali and Kahlo. I used the steps found here to build this lesson from.


We used Crayola markers for the color wash in the background instead of the fancy ones mentioned in the post. Use water brushed over the marker color outline to create a bleeding effect. It's beautiful underneath the patterned overlay. 


Wednesday, November 12, 2014

Day of the Dead Calaca Collage Collaboration

In our middle school course scheduling, 8th graders take both Spanish and Art as quarter classes during first semester. Since the classes are offered back to back in the fall, we (Mrs. Einerwold, Mrs. Peroddy and myself) organized a collaborative project that combined both a Dia de los Muertos iMovie video project with a paper collage artwork.

Check out the entire project outline and resources below.  Of course, we were initially inspired by this fabulous project: Día de los Muertos Calavera Collage from Modern Art 4 Kids. Mrs. Einerwold started things off with the 8th grade students in Spanish creating informational videos about Dia de los Muertos. Students were asked to follow a simple outline to ensure the most factual information about Day of the Dead was presented in their work.


The videos were then viewed by the 4th grade art students as an introduction to their Calaca Collage project. A student example is posted below.


The double-sided collage was then started by our 4th grade partners (Mrs. Peroddy's video demo below). See Mrs. Peroddy's introductory blog post here.


Once the 4th graders finished their sides, the artworks were delivered to the middle school where 8th graders began creating the other half. Students were asked to complete a worksheet with the following questions to begin this process. 


You will be choosing a 4th grade Day of the Dead calaca as the starting point for your artwork. As you look through the artworks, take note (in your brain) what features of the artwork catches your eye.  Then answer: What do you like about it? Why did you choose this artwork? Be specific.
  
Your calaca will be the “big brother” or “big sister” to  the existing one in the work. Your calaca doesn’t have to match the other one exactly, but we should be able to see correlations between the two. You are creating features that enhance what the 4th grader already did. What features are you going to highlight in your own work? Again, be specific and list at least three ideas (these could be color, pattern, line design, characteristics of features or accessories, etc). How are you going to add your own twist in your addition? How can you build upon what the 4th grader did to create unity in the work?

8th graders were encouraged to use a variety of materials for their collages. Options were colored construction/patterned paper, colored masking tape, Sharpies, glitter glue, squeezable puff paint, metallic sticker paper, sequins and embroidery floss.

Now...for 8th grade progress at this point:


These works will be displayed in our hallways at the end of this week. Please check back for a final view of our Day of the Dead Calaca Collage Collaborations soon!

Friday, October 24, 2014

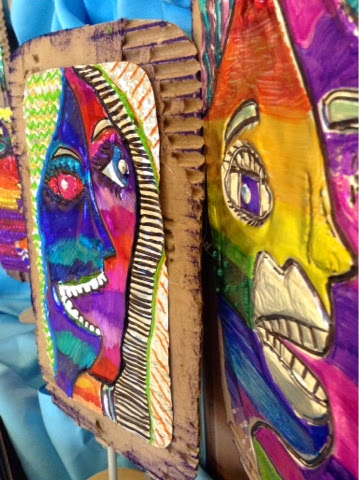
Picasso Portraits (tooling foil edition)

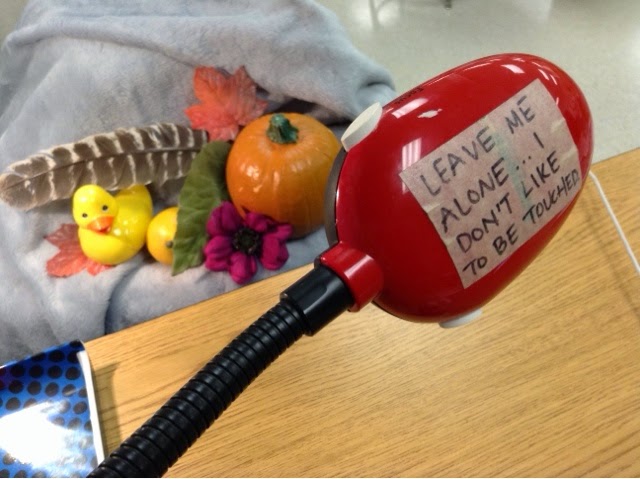
Picasso Portraits are an 8th grade lesson we've done a number of times here at BMS. We start with practicing realistic portraits by looking at facial proportions and do a couple of "draw together" activities. Typically, I will draw and project on my Ladibug doc cam and students will follow along with me.  I also show a number of YouTube demo videos on specific parts like eyes and noses. One of my favorites for a realistic eye=>>>>  https://www.youtube.com/watch?v=LZ9Hpp8JygIc

After we feel comfortable with drawing a realistic face,  we move on to creating a portrait done in the Cubist style. I spend lots of time emphasizing the fact that a Cubist work shows multiple views in one artwork.  Again, we practice together before we start the final work.

This quarter, the project was created on metal tooling foil. We drew a final copy and then that image was embossed on the foil using a ball-point pen. Color Sharpies were used to show emphasis, pattern, gradation of color as well as texture though the embossing of the metal.

Students were also asked to mount the foil on a piece of distressed cardboard for display. We made small wooden stands from scraps from the tech department.

A twist on an old favorite!


Wednesday, September 24, 2014

Surrealist Portraits (& Frida!)

Realistic portraits are never a favorite project of 8th graders.  This lesson helps overcome those complaints by combining the skills and technique of drawing portraits with a Surrealist collage twist. We discuss Frida's work (and even though she did not consider herself a Surrealist painter) we talk about why she could be considered one. After the project is finished, we write a short artist statement to explain the story behind our portrait. 


Friday, September 12, 2014

Multimedia Still Life Drawings


Our second project in 8th grade art (after our Op Art drawings) was a still life multimedia work. Since it's always difficult to get 30+ kids around one small still life, I use my Ladibug camera to project the image on a screen. Using the camera also allows me to take a photo and post it into Edmodo so the students can view it and work on the project at home. 

We spent some time practicing observational drawing together first and then worked independantly to create our own works. Finished projects are shown below. 


Using the camera to project the still life objects...


This is how our still life appeared on Edmodo.


Adding the marker technique to our still life.


Using Crayola Stick Stixs to blend and show value. 


Torn magazine pages filled in our collage area.